 This
This fall I've made much of the requisite apple dishes. You know the drill- apple pie, apple crisp, baked apples. Yummy, but after awhile-can I say it? Boring. I was going through my binder of clipped-I have to try these someday-recipes and found a new one. I wouldn't have to pass up the gleaming piles of the fruit at the farmer's market again.
The gem that caught my eye? Apple and sausage pie printed in the magazine
Edible Twin Cities. I looked over the recipe. Butter, flour, sausage (of course), apple, shredded cheddar cheese.
Hmm. I love cheddar cheese, but thought that feta would be tastier. And since the
spinach fiasco was over I picked up some crisp leaves at Ballard Market.
The more I thought about the combination, the more I realized I had seen it somewhere else, in specialty sausages. Turkey sausages with apple, or with spinach and feta. I had the backing of butchers, so I knew I was heading down the right track.
The big question though was Tart? or Pie? The original recipe was for a single crust pie. Frankly, with the whole overdose of apple pie I was kind of sick of pies. Why not try to make a tart instead? I like the crunchy ridges that the pan makes on the crust and my tart tins haven't been in heavy rotation lately. It was settled.
So is there any difference between a tart and a pie? Well, the shape-- the most obvious difference-- seems to be the only one. The index in
Baking with Julia notes that pie and tart dough are one in the same. The
Joy of Cooking also comes to the same conclusion. So is it just the pan? Perhaps. I checked out
Wikipedia to find out more. It turns out that a pie is generally considered a baked shell that completely encases a sweet or savory filling. Bottom crust only pies are thought of as tarts or
tartlets. And, the fancy sounding
tarte tatin? An upside down, single crust fruit tart with a
very interesting and much debated history. But, back to the pie and tart
quandary. After my
Wikipedia search I was left with a burning question: If a tart is only a single crust pie, why do we have tart pans at all? Why not just use a pie pan to make a tart? And what about the free-standing rustic tart? That doesn't need a pan at all! Google-
ing was in order because my cookbooks weren't spilling any more secrets.
The results? Tarts are cooked in tart pans (most with a removable ring) so that they can be taken out of the pan easily and displayed nicely on a buffet or table. What a simple explanation.
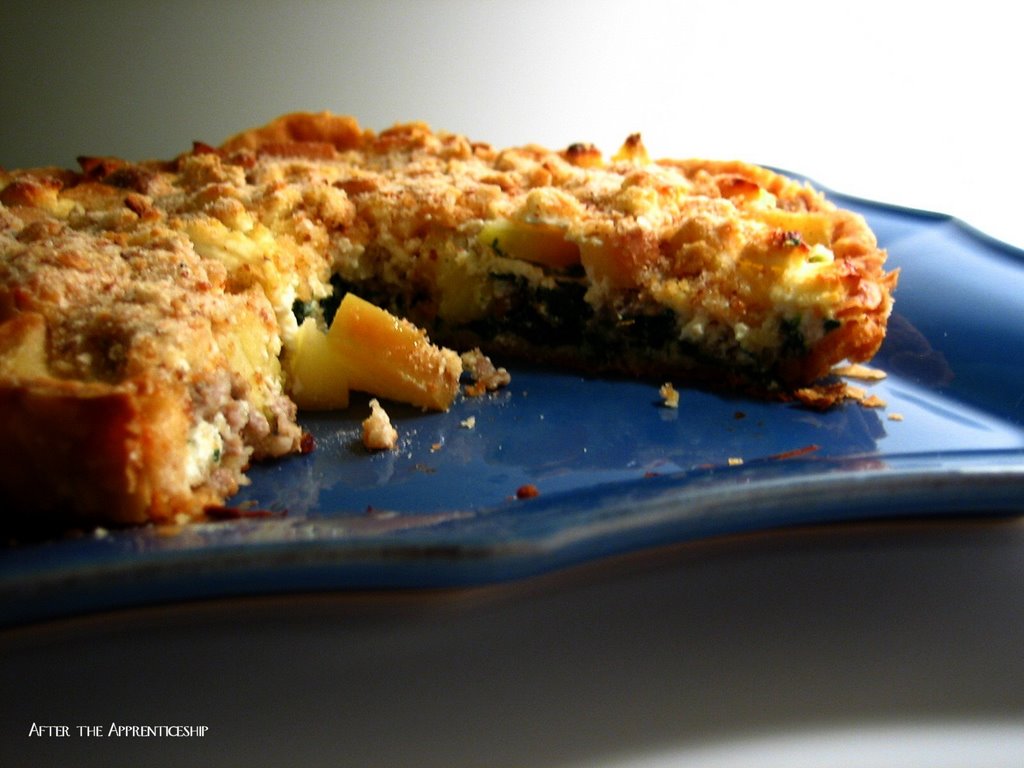
 Apple and Sausage Tart
Inspired by Pepin Heights Apple Farm
Serves 4-6Ingredients
--4 Tbs. unsalted butter, cold and cut into small pieces
--1/2 cup all-purpose flour
--1 Tbs. ice-cold water
--1/2 lb. sausage, uncooked
--1 Tbs. butter
--1 apple, cored and diced
--2 egg yolks
--1 egg
--1 cup heavy cream (or half & half)
--salt & pepper to taste
--1/2 cup feta
--3 cups spinach--Breadcrumbs for sprinkling on top, optionalDirections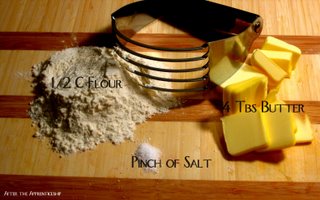
1) With a pastry blender, cut 4 Tbs. chilled butter into flour and salt until coarse crumbs form. Add 1-2 Tbs. of ice water to bring the dough together. Wrap and chill in the fridge for a half-hour. Preheat the oven to 350 degrees.
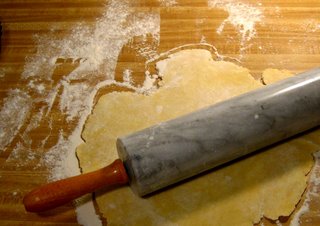
2) When the dough has chilled, roll the pie dough out on a lightly floured surface. Create a circle that is large enough to cover a 9" tart pan. Press the dough into the tart pan and weigh it down with dried beans or pie weights. Trim the excess dough and bake the crust for 20-25 minutes.
3) Remove the sausage from its casing and saute over medium heat, crumbling. Drain the the meat if there is too much grease. Remove the meat from the pan.
4) Heat a separate pan, add the remaining 1 Tbs. butter. Saute the apple until it has just softened.
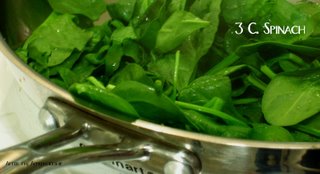
5) In the pan used to cook the sausage, add the spinach and cook over medium heat until it just wilts, about 3 minutes. Remove the spinach and shock under cold water. Squeeze the spinach of excess water and chop.
6) In a bowl, combine the egg and egg yolks, cream, salt, and pepper. Mix together lightly with a fork or whisk.
7) Place the sausage, spinach, and apple in the
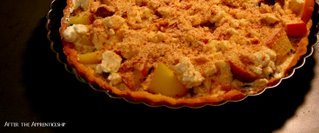
pre-baked crust. Cover with crumbled feta and pour the egg mixture evenly over the tart. If you want to use bread crumbs, sprinkle them over the tart now. Bake for 45-50 minutes. Before you cut into this dish let it cool for about 5 minutes.
Quick Tips...or maybe not so quick tips...
- Making a tart (or pie) crust is pretty easy, just make sure you use ice water, and very cold butter. Work quick, wrap the dough up, and pop it into the fridge. If the dough becomes unruly let it cool off in the fridge for about 10 minutes and try again.
- To get your beautiful crust into the tart pan without tearing it, fold the circle half, then fold it in half again so you have a little triangle. Put the point of the triangle in the middle of the tart pan and unfold your dough. If it rips, just use some of the excess dough to patch it up. No one will know and of course it will taste good- it's butter and flour.
- The amount of pepper to use depends on how spicy or sweet the sausages are. Do you feel like having a little kick with the sweet apples? Find spicy sausage and use as much pepper as you dare. Perhaps you want your tart to be sweeter- without that peppery interruption-- buy sweet sausage and use just a touch of pepper. But use salt. It will make all of the tart's flavors pop.
- When you pour the egg mixture into the tart shell be sure to either (1) get it all into the shell and don't let any of it overflow or (2) put a sheet pan under the tart pan so when it does spill over the edge of the tart it wont become a permanent fixture in the bottom of your oven. (Why do manufacturers think that making an oven that isn't self cleaning is a good idea? Do I sound bitter? It's because I am.).
- I used bread crumbs sprinkled on top of my tart. I wish I hadn't. I thought they were too crunchy. However, the tasting panel said that the bread crumbs were perfect. You decide.


